Container는 어떻게 동작하는가[2] - 네트워크 격리
Container는 어떻게 동작하는가[2] - 네트워크 통신
Docker와 같은 Container 소프트웨어를 설치하면 docker0 라는 이더넷 인터페이스가 생성되는 것을 확인할 수 있다.
cenovis@dedicatedserver:~ $ ifconfig
docker0: flags=4163<UP,BROADCAST,RUNNING,MULTICAST>  mtu 1500
        inet 172.17.0.1  netmask 255.255.0.0  broadcast 172.17.255.255
        inet6 fe80::42:46ff:fee1:dae8  prefixlen 64  scopeid 0x20<link>
        ether 02:42:46:e1:da:e8  txqueuelen 0  (Ethernet)
        RX packets 7776  bytes 414572 (404.8 KiB)
        RX errors 0  dropped 0  overruns 0  frame 0
        TX packets 16280  bytes 32791685 (31.2 MiB)
        TX errors 0  dropped 0 overruns 0  carrier 0  collisions 0

eth0: flags=4163<UP,BROADCAST,RUNNING,MULTICAST>  mtu 1500
        inet 192.168.0.249  netmask 255.255.254.0  broadcast 192.168.1.255
        inet6 fe80::4eda:76f2:fae1:9be0  prefixlen 64  scopeid 0x20<link>
        ether dc:a6:32:2c:d7:9a  txqueuelen 1000  (Ethernet)
        RX packets 10578667  bytes 1287122680 (1.1 GiB)
        RX errors 0  dropped 0  overruns 0  frame 0
        TX packets 33850741  bytes 5328131408 (4.9 GiB)
        TX errors 0  dropped 0 overruns 0  carrier 0  collisions 0

lo: flags=73<UP,LOOPBACK,RUNNING>  mtu 65536
        inet 127.0.0.1  netmask 255.0.0.0
        inet6 ::1  prefixlen 128  scopeid 0x10<host>
        loop  txqueuelen 1000  (Local Loopback)
        RX packets 40  bytes 4024 (3.9 KiB)
        RX errors 0  dropped 0  overruns 0  frame 0
        TX packets 40  bytes 4024 (3.9 KiB)
        TX errors 0  dropped 0 overruns 0  carrier 0  collisions 0
이 인터페이스는 브릿지 네트워크 인터페이스로 Docker를 통해 생성된 컨테이너들이 호스트 네트워크와 통신하는데 사용되며, 172.17.0.1 을 기본 게이트웨이로, 172.17.0.1 ~ 172.17.255.255 까지의 주소가 컨테이너들의 IP 주소 대역으로 할당된다. 이런 인터페이스가 왜 생성되는 것인지 알아보자.
리눅스의 네트워크 통신
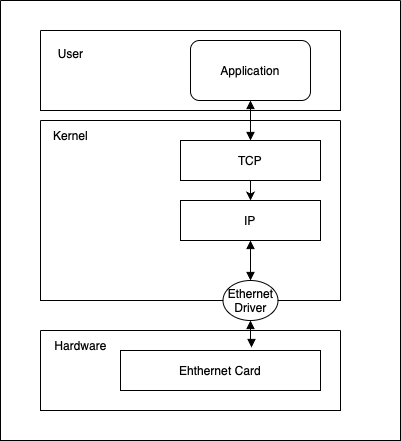
리눅스 운영체제가 부팅되면 커널이 로드되고, 커널은 네트워크 통신을 위해 네트워크 카드의 드라이버를 로드하게 된다. 일반적으로 이더넷 카드(랜 포트를 가진 그것)의 자원을 네트워크 드라이버가 추상화시켜 운영체제에 제공한다. 즉, LAN 내에서 물리적인 통신을 위해 사용하게 되는 것이다.
여기에 ifconfig 등의 명령어로 조회되는 네트워크 인터페이스가 존재한다. 이 네트워크 인터페이스는 논리적인 연결을 구성하는 네트워크 설정을 관리하는 역할이며 IP를 할당하고 이를 통신할때 어떤 게이트웨이로 라우팅 시킬 것인가 등의 정보를 입력하는 대상이 된다.
컨테이너 통신을 위한 네트워크
docker0는 격리된 컨테이너들의 네트워크 통신을 위해 제공되는 브릿지 네트워크 인터페이스다.
즉, 호스트의 네트워크를 직접 사용하지 않고 별도의 NAT를 구성하며, 이 브릿지를 통하여 컨테이너 간의 통신, 그리고 외부에서 컨테이너로의 통신을 하는데 이용된다. 각각의 컨테이너는 생성 시 호스트의 Virtual Ethernet을 이용하여 eth0 인터페이스를 생성한다. 우린 이걸 veth pair 라고 부른다.
아래 예를 살펴보자
cenovis@dedicatedserver:~ $ docker run -it ubuntu:latest bash
root@85450c5e369d:/# ifconfig
eth0: flags=4163<UP,BROADCAST,RUNNING,MULTICAST>  mtu 1500
        inet 172.17.0.2  netmask 255.255.0.0  broadcast 172.17.255.255
        ether 02:42:ac:11:00:02  txqueuelen 0  (Ethernet)
        RX packets 16281  bytes 32791279 (32.7 MB)
        RX errors 0  dropped 0  overruns 0  frame 0
        TX packets 7776  bytes 523436 (523.4 KB)
        TX errors 0  dropped 0 overruns 0  carrier 0  collisions 0

lo: flags=73<UP,LOOPBACK,RUNNING>  mtu 65536
        inet 127.0.0.1  netmask 255.0.0.0
        loop  txqueuelen 1000  (Local Loopback)
        RX packets 0  bytes 0 (0.0 B)
        RX errors 0  dropped 0  overruns 0  frame 0
        TX packets 0  bytes 0 (0.0 B)
        TX errors 0  dropped 0 overruns 0  carrier 0  collisions 0
컨테이너 내에서 eth0 인터페이스의 ip 주소가 172.17.0.2로 할당되었음을 확인할 수 있고, 이더넷의 MAC Address가 02:42:ac:11:00:02로 잡혀있는 것을 확인할 수 있다.
이제 호스트에서 확인해보자
cenovis@dedicatedserver:~ $ ifconfig
...
veth82aaf3e: flags=4163<UP,BROADCAST,RUNNING,MULTICAST>  mtu 1500
        inet6 fe80::a879:6cff:fec5:7352  prefixlen 64  scopeid 0x20<link>
        ether aa:79:6c:c5:73:52  txqueuelen 0  (Ethernet)
        RX packets 7776  bytes 523436 (511.1 KiB)
        RX errors 0  dropped 0  overruns 0  frame 0
        TX packets 16281  bytes 32791279 (31.2 MiB)
        TX errors 0  dropped 0 overruns 0  carrier 0  collisions 0
veth* 형태의 인터페이스가 새롭게 생성된 것을 알 수 있다. 새롭게 생성된 Virtual Ethernet 이 정말로 컨테이너에 연결되어 있음을 확인해보자
cenovis@dedicatedserver:~ $ docker inspect --format '{{ .State.Pid }}' ubuntu  # 우분투 이미지를 생성 시 이름을 ubuntu로 정했고, 이 컨테이너의 PID를 얻어온다.
74443
cenovis@dedicatedserver:~ $ sudo nsenter -t 74443 -n ip link # 74443 프로세스가 속한 네트워크 네임스페이스로 진입하여 인터페이스 정보를 얻어옴
1: lo: <LOOPBACK,UP,LOWER_UP> mtu 65536 qdisc noqueue state UNKNOWN mode DEFAULT group default qlen 1000
    link/loopback 00:00:00:00:00:00 brd 00:00:00:00:00:00
412: eth0@if413: <BROADCAST,MULTICAST,UP,LOWER_UP> mtu 1500 qdisc noqueue state UP mode DEFAULT group default
    link/ether 02:42:ac:11:00:02 brd ff:ff:ff:ff:ff:ff link-netnsid 0

cenovis@dedicatedserver:~ $ ip link # 호스트의 결과
1: lo: <LOOPBACK,UP,LOWER_UP> mtu 65536 qdisc noqueue state UNKNOWN mode DEFAULT group default qlen 1000
    link/loopback 00:00:00:00:00:00 brd 00:00:00:00:00:00
2: eth0: <BROADCAST,MULTICAST,UP,LOWER_UP> mtu 1500 qdisc mq state UP mode DEFAULT group default qlen 1000
    link/ether dc:a6:32:2c:d7:9a brd ff:ff:ff:ff:ff:ff
405: br-dea7abe5365f: <BROADCAST,MULTICAST,UP,LOWER_UP> mtu 1500 qdisc noqueue state UP mode DEFAULT group default
    link/ether 02:42:2d:30:24:09 brd ff:ff:ff:ff:ff:ff
413: veth82aaf3e@if412: <BROADCAST,MULTICAST,UP,LOWER_UP> mtu 1500 qdisc noqueue master docker0 state UP mode DEFAULT group default
    link/ether aa:79:6c:c5:73:52 brd ff:ff:ff:ff:ff:ff link-netnsid 1
여기서 컨테이너의 eth0if413 에서 413이 호스트의 413번 veth82aaf32@if412 과 연결되어 있음을 확인할 수 있다.
Docker0, 브릿지 네트워크의 필요성
자 이제 두개의 ubuntu 컨테이너를 띄웠다고 가정해보자. 이름을 ubuntu-0, ubuntu-1이라고 정하고 아래 그림을 살펴보자.
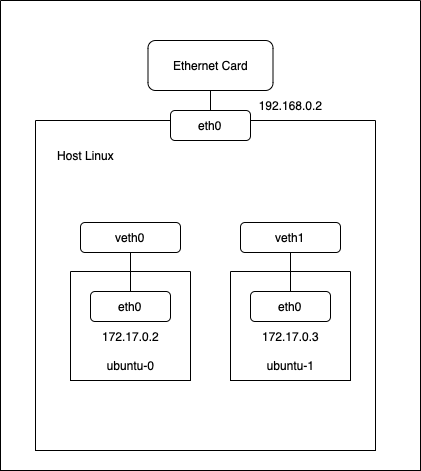
Docker는 기본적으로 컨테이너를 할당할 때 veth를 생성하고 IP주소를 직접 부여하지만 ubuntu-0과 ubuntu-1 은 각각 eth0 인터페이스에 IP 주소를 172.17.0.2, 172.17.0.3을 수동 지정했다고 가정해보자. 이더넷은 OSI 7계층 기준 하위 2계층(Physical, Data Link) 이하에 해당하는데 연결된 게이트웨이로 패킷을 보내는 역할을 수행한다. 문제는 현재 veth0 과 veth1 에 연결된 게이트웨이가 없다는 것이다. 서로간의 통신(같은 네트워크 대역의 통신)은 물론 외부(인터넷) 통신 역시 호스트 네트워크 eth0로 라우팅 경로가 없기 때문에 불가능하다.
여기에서 docker0 브릿지 네트워크의 필요성이 생긴다. docker0 은 컨테이너들 입장에서는 기본적으로 라우터이다. 즉 게이트웨이가 된다는 말이다. 이 브릿지 네트워크를 통해서 컨테이너 간의 통신이 성립되게 된다. 또한 docker0 는 생성 시에 외부 통신을 위한 POSTROUTE 체인이 설정되어 있고, MASQUERADE 까지 되어 있어 Container가 외부와 통신이 가능하다.
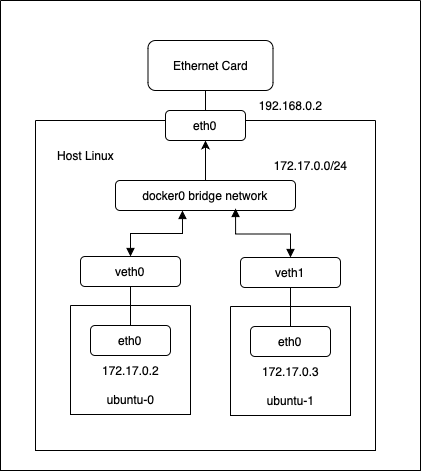
직접 라우팅을 설정해보기
호스트 리눅스에서 새로운 veth와 브릿지 네트워크를 생성하고, 컨테이너에서 새로운 이더넷 인터페이스를 생성하여 페어를 시키고 새로운 IP로 통신을 하게 하는 것 역시 가능하다.
우선 생성한 컨테이너들의 Pid를 확보하자
 1. 우분투 컨테이너의 Pid를 확보한다.
ubuntu0_pid=$(docker inspect --format '{{ .State.Pid }}' ubuntu-0)
ubuntu1_pid=$(docker inspect --format '{{ .State.Pid }}' ubuntu-1)

# 2. 신규 브릿지 네트워크를 추가하고 활성화 한다.
sudo ip link add name new_bridge type bridge
sudo ip link set dev new_bridge up

# 3. 브릿지에 172.18.0.0/24 대역의 IP를 할당한다
sudo ip addr add 172.18.0.1/24 dev new_bridge
#-------------- 출력-------------------
new_bridge: flags=4163<UP,BROADCAST,RUNNING,MULTICAST>  mtu 1500
        inet 172.18.0.1  netmask 255.255.255.0  broadcast 0.0.0.0
        inet6 fe80::405f:feff:fe16:860c  prefixlen 64  scopeid 0x20<link>
        ether 42:5f:fe:16:86:0c  txqueuelen 1000  (Ethernet)
        RX packets 0  bytes 0 (0.0 B)
        RX errors 0  dropped 0  overruns 0  frame 0
        TX packets 32  bytes 4461 (4.3 KiB)
        TX errors 0  dropped 0 overruns 0  carrier 0  collisions 0
그리고 veth 를 두개 생성하고, 각 veth에 veth 페어를 생성한다.
# 4. veth를 두개 생성하고, peer 옵션을 이용하여 veth 페어를 생성한다.
sudo ip link add veth-ubuntu0 type veth peer name veth-ubuntu0-br
sudo ip link add veth-ubuntu1 type veth peer name veth-ubuntu1-br

# 5. 생성한 veth들을 각각의 컨테이너의 네임스페이스로 설정한다.
sudo ip link set veth-ubuntu0 netns $ubuntu0_pid
sudo ip link set veth-ubuntu1 netns $ubuntu1_pid

# 6. 컨테이너 네임스페이스에 이터넷 인터페이스를 호스트에 생성한 veth와 연결한다.
sudo nsenter -t $ubuntu0_pid -n ip link set dev veth-ubuntu0 name eth1
sudo nsenter -t $ubuntu1_pid -n ip link set dev veth-ubuntu1 name eth1

# 7. veth를 브릿지와 연결한다.
sudo ip link set veth-ubuntu0-br master new_bridge
sudo ip link set veth-ubuntu1-br master new_bridge

ifconfig
veth-ubuntu0-br: flags=4163<DOWN,BROADCAST,RUNNING,MULTICAST>  mtu 1500
        inet6 fe80::18d6:b3ff:fe0e:88ce  prefixlen 64  scopeid 0x20<link>
        ether 1a:d6:b3:0e:88:ce  txqueuelen 1000  (Ethernet)
        RX packets 5  bytes 322 (322.0 B)
        RX errors 0  dropped 0  overruns 0  frame 0
        TX packets 30  bytes 3218 (3.1 KiB)
        TX errors 0  dropped 0 overruns 0  carrier 0  collisions 0

veth-ubuntu1-br: flags=4163<DOWN,BROADCAST,RUNNING,MULTICAST>  mtu 1500
        inet6 fe80::b4aa:12ff:fe94:3944  prefixlen 64  scopeid 0x20<link>
        ether b6:aa:12:94:39:44  txqueuelen 1000  (Ethernet)
        RX packets 10  bytes 812 (812.0 B)
        RX errors 0  dropped 0  overruns 0  frame 0
        TX packets 30  bytes 3158 (3.0 KiB)
        TX errors 0  dropped 0 overruns 0  carrier 0  collisions 0
이제 호스트에서 생성한 veth와 연결된 veth pair들이 조회되는 것을 확인할 수 있다. 이제 남은 작업은 실제 생성한 veth 를 각 컨테이너의 eth1 인터페이스에 새로 연결해주는 것이다.
# 8. veth pair 인터페이스 활성화
sudo ip link set veth-ubuntu0-br up
sudo ip link set veth-ubuntu1-br up

# 9. 컨테이너 네임스페이스에서 veth 활성화
sudo nsenter -t $ubuntu0_pid -n ip link set dev eth1 up
sudo nsenter -t $ubuntu1_pid -n ip link set dev eth1 up

# 10. 컨테이너 네임스페이스에 IP를 할당한다.
sudo nsenter -t $ubuntu0_pid -n ip addr add 172.18.0.2/24 dev eth1
sudo nsenter -t $ubuntu1_pid -n ip addr add 172.18.0.3/24 dev eth1
이 작업까지 마치면 각 컨테이너에 eth1 이 신규 생성 된 것을 확인할 수 있다.
$ docker exec -it ubuntu-0 ifconfig
eth0: flags=4163<UP,BROADCAST,RUNNING,MULTICAST>  mtu 1500
        inet 172.17.0.2  netmask 255.255.0.0  broadcast 172.17.255.255
        ether 02:42:ac:11:00:02  txqueuelen 0  (Ethernet)
        RX packets 12602  bytes 32553890 (32.5 MB)
        RX errors 0  dropped 0  overruns 0  frame 0
        TX packets 5409  bytes 366880 (366.8 KB)
        TX errors 0  dropped 0 overruns 0  carrier 0  collisions 0

eth1: flags=4163<UP,BROADCAST,RUNNING,MULTICAST>  mtu 1500
        inet 172.18.0.2  netmask 255.255.255.0  broadcast 0.0.0.0
        ether 2a:2c:10:4e:c0:27  txqueuelen 1000  (Ethernet)
        RX packets 17  bytes 2336 (2.3 KB)
        RX errors 0  dropped 0  overruns 0  frame 0
        TX packets 0  bytes 0 (0.0 B)
        TX errors 0  dropped 0 overruns 0  carrier 0  collisions 0

lo: flags=73<UP,LOOPBACK,RUNNING>  mtu 65536
        inet 127.0.0.1  netmask 255.0.0.0
        loop  txqueuelen 1000  (Local Loopback)
        RX packets 0  bytes 0 (0.0 B)
        RX errors 0  dropped 0  overruns 0  frame 0
        TX packets 0  bytes 0 (0.0 B)
        TX errors 0  dropped 0 overruns 0  carrier 0  collisions 0

$ docker exec -it ubuntu-1 ifconfig
eth0: flags=4163<UP,BROADCAST,RUNNING,MULTICAST>  mtu 1500
        inet 172.17.0.3  netmask 255.255.0.0  broadcast 172.17.255.255
        ether 02:42:ac:11:00:03  txqueuelen 0  (Ethernet)
        RX packets 12509  bytes 32542121 (32.5 MB)
        RX errors 0  dropped 0  overruns 0  frame 0
        TX packets 6261  bytes 422650 (422.6 KB)
        TX errors 0  dropped 0 overruns 0  carrier 0  collisions 0

eth1: flags=4163<UP,BROADCAST,RUNNING,MULTICAST>  mtu 1500
        inet 172.18.0.3  netmask 255.255.255.0  broadcast 0.0.0.0
        ether 12:3f:03:44:cd:04  txqueuelen 1000  (Ethernet)
        RX packets 16  bytes 2206 (2.2 KB)
        RX errors 0  dropped 0  overruns 0  frame 0
        TX packets 0  bytes 0 (0.0 B)
        TX errors 0  dropped 0 overruns 0  carrier 0  collisions 0

lo: flags=73<UP,LOOPBACK,RUNNING>  mtu 65536
        inet 127.0.0.1  netmask 255.0.0.0
        loop  txqueuelen 1000  (Local Loopback)
        RX packets 0  bytes 0 (0.0 B)
        RX errors 0  dropped 0  overruns 0  frame 0
        TX packets 0  bytes 0 (0.0 B)
        TX errors 0  dropped 0 overruns 0  carrier 0  collisions 0
자 그럼 172.18.0.0/24 대역에서 통신이 정상적으로 이루어지는지 확인하기 위해 ubuntu-0 컨테이너와 ubuntu-1 컨테이너 사이에서 ping 명령어를 날려보자
$ docker exec ubuntu-0 ping 172.18.0.3
PING 172.18.0.3 (172.18.0.3) 56(84) bytes of data.
$ docker exec ubuntu-1 ping 172.18.0.2
PING 172.18.0.2 (172.18.0.2) 56(84) bytes of data.
$ docker exec ubuntu-0 172.18.0.1
$ docker exec ubuntu-1 ping 172.18.0.1
PING 172.18.0.1 (172.18.0.1) 56(84) bytes of data.
64 bytes from 172.18.0.1: icmp_seq=1 ttl=64 time=0.227 ms
64 bytes from 172.18.0.1: icmp_seq=2 ttl=64 time=0.108 ms
게이트웨이로의 통신은 정상적으로 이루어지나 컨테이너 간 통신이 이루어지지 않는다는 것을 확인할 수 있다. 이는 기본적으로 리눅스에서 브릿지 네트워크에서 동작하는 패킷 포워딩 규칙이 정해져있지 않아서 그렇다. 패킷 포워딩 규칙을 추가해보자.
# 브릿지 인터페이스 내에서 포워딩을 허용
$ sudo iptables -A FORWARD -i new_bridge -o new_bridge -j ACCEPT

$ docker exec ubuntu-0 ping 172.18.0.3
PING 172.18.0.3 (172.18.0.3) 56(84) bytes of data.
64 bytes from 172.18.0.3: icmp_seq=1 ttl=64 time=0.114 ms
64 bytes from 172.18.0.3: icmp_seq=2 ttl=64 time=0.071 ms
이렇게 컨테이너 간의 통신이 정상적으로 이루어지는 것을 확인할 수 있다. 현재까지의 컨테이너 네트워크 상황을 그려보면 아래와 같을 것이다.
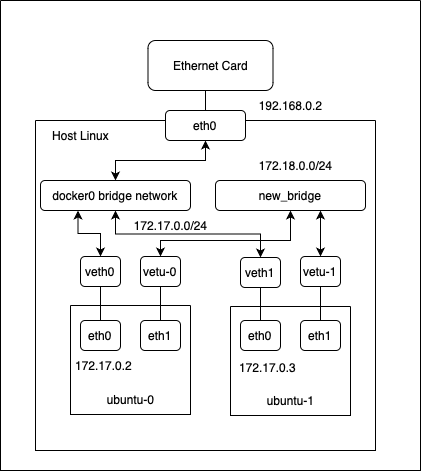
자 이제 각 컨테이너의 eth0 인터페이스를 비활성화 시켜보자.
$ sudo nsenter -t $ubuntu0_pid -n ip link set dev eth0 down
$ sudo nsenter -t $ubuntu1_pid -n ip link set dev eth0 down

$ docker exec ubuntu-0 ifconfig
eth1: flags=4163<UP,BROADCAST,RUNNING,MULTICAST>  mtu 1500
        inet 172.18.0.2  netmask 255.255.255.0  broadcast 0.0.0.0
        ether de:45:21:ee:c7:11  txqueuelen 1000  (Ethernet)
        RX packets 35  bytes 3512 (3.5 KB)
        RX errors 0  dropped 0  overruns 0  frame 0
        TX packets 8  bytes 504 (504.0 B)
        TX errors 0  dropped 0 overruns 0  carrier 0  collisions 0

lo: flags=73<UP,LOOPBACK,RUNNING>  mtu 65536
        inet 127.0.0.1  netmask 255.0.0.0
        loop  txqueuelen 1000  (Local Loopback)
        RX packets 10  bytes 840 (840.0 B)
        RX errors 0  dropped 0  overruns 0  frame 0
        TX packets 10  bytes 840 (840.0 B)
        TX errors 0  dropped 0 overruns 0  carrier 0  collisions 0

$ docker exec ubuntu-1 ifconfig
eth1: flags=4163<UP,BROADCAST,RUNNING,MULTICAST>  mtu 1500
        inet 172.18.0.3  netmask 255.255.255.0  broadcast 0.0.0.0
        ether 12:de:4e:d8:98:ff  txqueuelen 1000  (Ethernet)
        RX packets 37  bytes 3620 (3.6 KB)
        RX errors 0  dropped 0  overruns 0  frame 0
        TX packets 17  bytes 1274 (1.2 KB)
        TX errors 0  dropped 0 overruns 0  carrier 0  collisions 0

lo: flags=73<UP,LOOPBACK,RUNNING>  mtu 65536
        inet 127.0.0.1  netmask 255.0.0.0
        loop  txqueuelen 1000  (Local Loopback)
        RX packets 6  bytes 504 (504.0 B)
        RX errors 0  dropped 0  overruns 0  frame 0
        TX packets 6  bytes 504 (504.0 B)
        TX errors 0  dropped 0 overruns 0  carrier 0  collisions 0
eth0 인터페이스가 제거된 것을 확인할 수 있다. 여기서 문제가 발생한다. 현재 new_bridge는 호스트의 eth0으로의 포워딩 규칙이 설정되어 있지 않다. 그렇기 때문에 외부 서버와의 통신이 불가능하다.
$ docker exec ubuntu-0 ping 192.168.0.249
ping: connect: Network is unreachable
$ docker exec ubuntu-0 ping www.dohoon-kim.kr
ping: www.dohoon-kim.kr: Temporary failure in name resolution
이제 우리는 new_bridge의 대역에 속한 IP가 외부 통신을 할 때 MASQUERADE가 걸리도록 설정할 것이다.
# 브릿지 인터페이스에서 나가는 패킷을 허용
$ sudo iptables -A FORWARD -i new_bridge -j ACCEPT
# 브릿지 인터페이스로 들어오는 패킷을 허용
$ sudo iptables -A FORWARD -o new_bridge -j ACCEPT

# 외부 포워딩 시 MASQUERADE 설정
sudo iptables -t nat -A POSTROUTING -s 172.18.0.0/24 -o eth0 -j MASQUERADE

$ sudo iptables -t nat -L POSTROUTING --line-numbers
Chain POSTROUTING (policy ACCEPT)
num  target     prot opt source               destination
1    MASQUERADE  all  --  172.23.0.0/16        anywhere
2    MASQUERADE  all  --  172.17.0.0/16        anywhere
3    MASQUERADE  all  --  172.18.0.0/24        anywhere

# 컨테이너의 Default Gateway 설정
$ ubuntu0_pid=$(docker inspect --format '{{ .State.Pid }}' ubuntu-0)
$ ubuntu1_pid=$(docker inspect --format '{{ .State.Pid }}' ubuntu-1)

$ sudo nsenter -t $ubuntu0_pid -n ip route add default via 172.18.0.1
$ sudo nsenter -t $ubuntu1_pid -n ip route add default via 172.18.0.1
이제 외부와 통신이 되는지 확인해보자.
docker exec ubuntu-0 ping www.dohoon-kim.kr
PING dohoon-kim.kr (121.130.220.154) 56(84) bytes of data.
64 bytes from 121.130.220.154 (121.130.220.154): icmp_seq=1 ttl=63 time=0.422 ms
64 bytes from 121.130.220.154 (121.130.220.154): icmp_seq=2 ttl=63 time=0.501 ms
64 bytes from 121.130.220.154 (121.130.220.154): icmp_seq=3 ttl=63 time=0.496 ms
정상적으로 ping이 가는것을 확인할 수 있다.
현 상태를 그림으로 나타내면 아래와 같다.
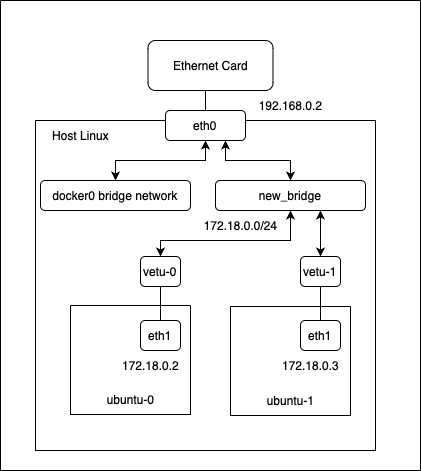
포트포워딩
이제 우리는 통신을 위해 라우팅 규칙을 정의하였고, 컨테이너 내부에서 nginx 를 한번 띄워볼 것이다.
$ docker exec ubuntu-0 apt update && apt install nginx -y
$ docker exec ubuntu-0 service nginx start
$ docker exec ubuntu-1 apt update && apt install nginx -y
$ docker exec ubuntu-1 service nginx start
호스트에서 curl 명령로 각 컨테이너 IP에 curl 명령으로 GET을 해보면 기본 웹페이지가 로드되는 것을 확인할 수 있다. 외부에서 이 컨테이너 내부와 통신을 하려면 호스트의 특정 포트에 컨테이너 포트가 매핑되어야 한다. 이를 위에 호스트의 포트포워딩 규칙을 추가해주자
sudo iptables -t nat -A PREROUTING -i eth0 -p tcp --dport 8080 -j DNAT --to 172.18.0.2:80
sudo iptables -t nat -A PREROUTING -i eth0 -p tcp --dport 8081 -j DNAT --to 172.18.0.3:80
이렇게 하고 나면 호스트의 8080, 8081 포트가 개방되어있다는 가정하에 외부에서 호스트의 IP주소:8080,8081 포트로 컨테이너의 nginx 서비스에 접근하게 된다.
마치며
이 글에서는 Container Runtime에서 Network 격리가 어떤식으로 이루어지는지 살펴보았다. 사실 이녀석들이 네트워크 측면해서 해주는 것은 네트워크 환경을 생성, 네임스페이스에 할당, 관리해주는 편리한 집합체 같은 느낌으로 이해할 수있다. 나중에 다루겠지만 컨테이너 오케스트레이션을 담당하는 Kubernetes에서 사용하는 kubectl은 정말로 API를 호출하는 커맨드라인 툴일 뿐이고 kube-api 서버에서 이런 요청을 받아 실제 클러스터에 속한 노드들의 자원을 프로비저닝하고 할당/관리하는 역할을 수행한다.
마지막 포스트는 cgroup에 대해 간략하게만 알아볼 것이다. 사실 컨테이너를 사용하는 입장에서는 여기까지만 봐도 큰 문제는 없으니...